Odroid VuShell for VU7
Ürün Açıklaması
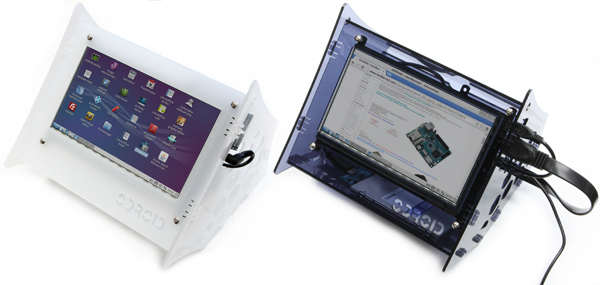
AÇIKLAMAVuShell, ODROID-VU7 ve ODROID-VU7 Plus için lazerle kesilmiş akrilik bir muhafazadır. Süslü VuShell ile kendi masaüstü bilgisayarınızı yapabilirsiniz. VuShell iki farklı görüntüleme açısına olanak tanır.ÖzelliklerVuShell is a laser cut acrylic enclosure for the ODROID-VU7 and ODROID-VU7 Plus. You can make your own desktop PC with the fancy VuShell. VuShell allows for two different viewing angles. TECHNICAL DETAILS - Dimension : 206 x 206 x 193 mm(approx. assembled)- Weight : 395g approx.- Color : Smoky Blue and Smoky White We have two different color choices. Smoky-Blue and Smoky-White. Package includeA. Front pieceB. Left side pieceC. Right side pieceD. Bottom1 pieceE. Bottom2 pieceF. Bottom3 pieceG. Cover pieceH. 16 x 5 mm screws (Philips dual round head, metal)I. 4 x 6 mm screws (Philips pan head, metal)J. 8 x 8mm female hex PCB spacers (metal)- You need a small Philips bit screw driver. - Laser cut acrylic pieces, screws and spacers are included.- ODROID-VU7/VU7plus and related accessories are NOT included Laser Cutting Video Assembly Guide for ODROID-C1+Note : Please take all steps with special care. Acrylic pieces are easy to crack. Step 1Peel the protective backing off both sides of all the laser-cut parts.Assemble the front piece first. You will need ODROID-VU7 package, (A), 8 x (H), 4 x (J)Step 2Align a spacer(J) on the bottom side and a screw(H) on the top side. Insert a screw and tighten it carefully. Keep the screw hole empty at the top middle marked with an X in the picture. Check Step4 for the other side of the ODROID-VU7.Step 3You need screws and spacers bundled with ODROID-VU7.Align a spacer on the bottom side and a screw on the top side. Insert a screw and tighten it carefullyYou only need to install screws at the 2 points marked with an O in the image. Step 4Continue using the screws from the ODROID-VU7 bundle. Add screws at the 2 points marked with an O in the image. Insert screws and tighten them gently. Step 5Plug in the Micro USB link b...